Portfolio Builder
Table of contents
1. Settings box.
2.Verification box
3. Investment selection boxes
4. Purchase list
5. Concluding
LANGUAGE
Click in the language box and select the language of your choice.
Choices at launch are: Deutsch | English | Español | Français | Nederlands
Should you notice errors, it would be much appreciated if you let us know so in the contact form and how you think it should be. Corrections are easy to implement.
In case language is not in the choice list and you would like to see it added, feel free to leave a message in the contact form as well. If you agree, you’ll receive a list of terms (English being the base language) in order to translate to your language.
PROFILE
Dropdown menu: Defensive | Balanced | Dynamic
Click on the investor profile that applies to you.
IPB stands for Investment Porfolio Builder
If you are not 100% sure what investor profile you have you should do 2 things
Read the investor profile assessment tutorial
Do the assessment which is totally free (under “Tools” in the top menu bar.)
GDP Bias
Dropdown menu: 1 AMER | 2 EMEA | 3 APAC | 4 World
Select the world zone you live in, this adds GDP weight to that zone your are likely most familiar with
If you wish to have a non-biased global portfolio, then you can choose “World”
In this case the real GDP weight is applied to each of the 40 monitored countries.
REF CCY
Dropdown menu : Available currencies.
AUD - CAD - CHF - CNY - DKK - EUR - GBP - GBX (GBX = 0.01 GBP)- HKD - INR - JPY - KRW - NOK - NZD - RUB - SEK - SGD - TRY - USD - ZAR
This would be your reference currency,
Ref currency is the one you pay your bills in, or the one you use to calculate and compare performances.
This will then be used in all calculations further down the PortfolioBuilder template.
AMOUNT IN CCY
Simply enter the amount you want to invest in the reference currency you entered.
MAX per line
Dropdown menu: Percentages available in a 2.0% to 15.0% range.
Bear with me here, this may feel a bit counter-intuitive at first:
Smallest Max
The PortfolioBuilder automatically calculates the “smallest max” which you are allowed to enter in the MAX per line field. The “smallest max” is shown in the dark blue field at the bottom of the settings box, just under "Max per line".
You can set a maximum percentage that you accept per investment, but this choice must never be lower than the smallest max allowed.
Max per line
You can set a maximum percentage per individual investment line that you allow in the “MAX per line” field.
However, if you set this variable below the “smallest max”, you’ll be immediately notified with an INCREASE % message. Simply choose a percentage that is above the “smallest maximum”.
Otherwise, the form will not produce correct distribution results.
Function of this is that
a higher "allowed maximum" per line results in less ‘resolution’, i.e. less individual lines
a lower "allowed maximum" gives you a higher 'resolution', meaning more individual investment lines as a result (and a more diverse purchase list).
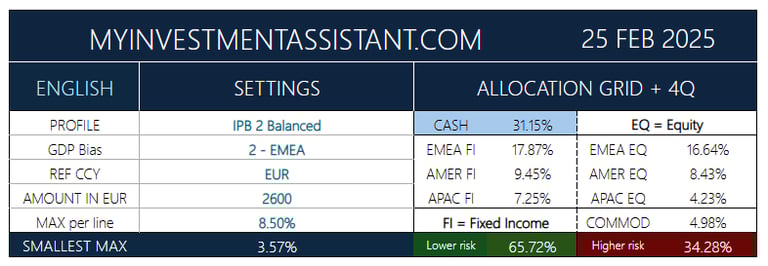
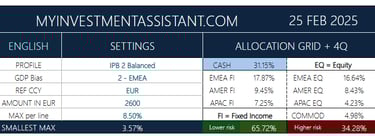
ALLOCATION GRID
Asset Allocation & risk numerical displays
PortfolioBuilder automatically produces the resulting Asset Allocation Grid
Left side shows the “lower risk” percentage, i.e. the sum of all cash and fixed income
Right side shows he “higher risk” percentages, i.e. the sum of equities and commodities.
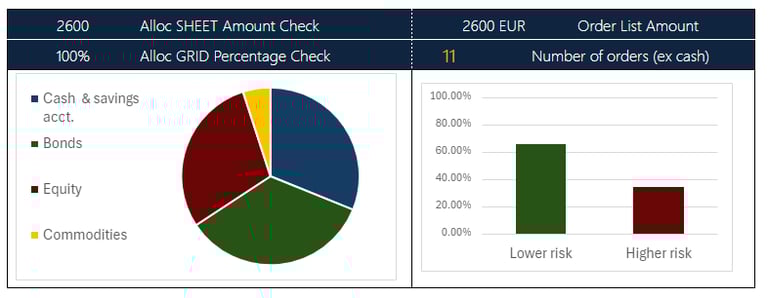
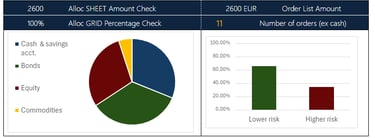
2 The Verification Box
Here you can verify a few things :
If all numbers add up correctly
The number of orders (investment lines) that were created.
A piechart visualizing weight per asset class
A basic bar chart showing distribution between lower and higher risk investments.
The sample below corresponds to the input of the settings box above, for a 2600 EUR investible amount and an EMEA balanced investor profile, leading to 11 separate investments to fill in.
1 The settings box
CHECK LIST
Do the calculated amounts (allocation sheet and order list) add up to the amount you wanted to invest ?
Do the amounts in the purchase list (order list) add up to the amount to invest.
Does the allocation percentage check add up to 100 ?
The orange figure is the number of individual investment lines you’ll find in the purchase list.
If you have a large “MAX per line” setting like e.g. 10%, the number of lines will be relatively low.
If on the contrary you reduce the “MAX per line” setting, your purchase list will be a bit longer (more lines).
GRAPHS
An asset allocation pie chart gives you a visual of applied asset allocation
A bar chart on the right visualizes basic risk distribution.
Green = lower risk
Red = higher risk.
TROUBLESHOOTING
In case the amounts in the control box are not identical, or percentage check is not 100%, then
Check if your “Max per line” setting is higher than the “Smallest Max”
Check if you have chosen sufficient investments (see next section of this tutorial).
3 The investment selection boxes
Here is where the real action begins and you can choose your ETF’s out of a sample catalog to get a very first idea.
These ETF’s are merely a sample list to get you started and NOT investment advice.
You can of course choose any other ETF that is not listed in the sample ETF Catalog. The primary goal is to give you a decent template and a headstart by giving you an idea on how you can build your ETF portfolio. Later, when you grow into other instruments , the asset allocation principles remain untouched.
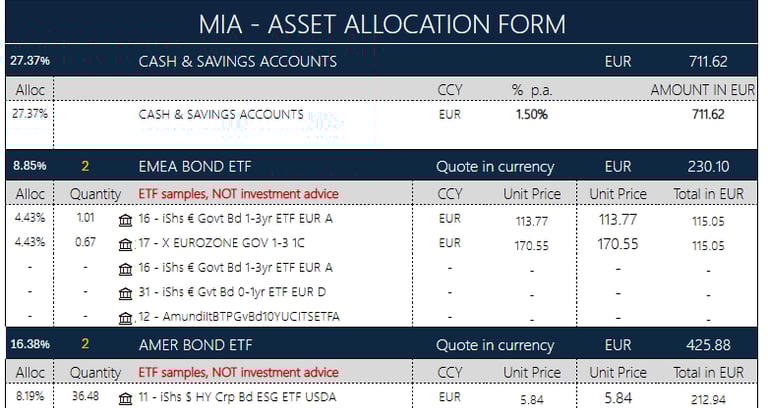
ALLOC (Percentage allocated)
The tool calculates and populates the template with the following data:
The number of individual lines per asset class per geographic zone
EMEA Bonds for instance has 2 investments attributed in this particular case.
The allocation percentages per asset class per geographic zone.
Cash is the first box on top of the template
Bonds (Fixed income) are the next 3 boxes
Shares (equities) follow with also 3 boxes
Commodities close the form with 1 box
Foreign exchange rates are applied automatically
The total amount per line in your reference currency (less headaches).
ETF SELECTION
The (already pre-filled) ETF selection boxes have been designed to be beginner-friendly, and make it very easy to find extra information. Nevertheless, have a sneak preview at the ETF Catalog to get a feel and be well-informed before choosing.
This catalog is far from being complete; there are thousands of ETF’s out there. But it does give you a first peek and the means to dig deeper. Let's have a closer look at such a selection line already containing a number of names.
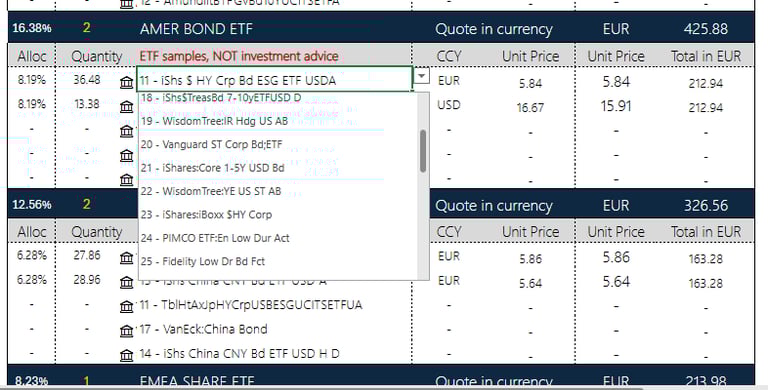
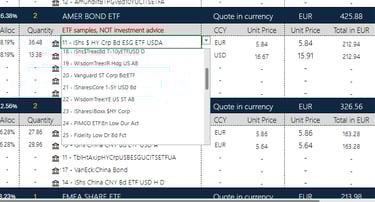
ETF Names in the list
Click on a name, and a down arrow appears at the right
Click on the down arrow, and a pop up window gives a list of ETF's
This list contains all the ETF's in the catalog for a given box (e.g. AMER bonds)
Scroll down/up to see all choices
Click on a name, an this replaces the previous name of that line
The system automatically adapts the price, number of shares for that line etc;
ETF YTD performance (Year-To-Date)
ETF TER (Total Expense Ratio) of each ETF.
Consider the ETF as the real “internal cost” of an ETF.
Currency
Closing price (last price previous day).
If you are intimidated or confused by these funny (not to say weird) names, don’t panic, you’re far from alone. So how do you handle this? Just click on the “bank icon” at the left of the fund you want to examine.
The bank icon
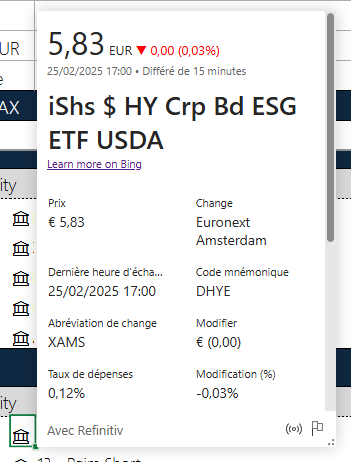
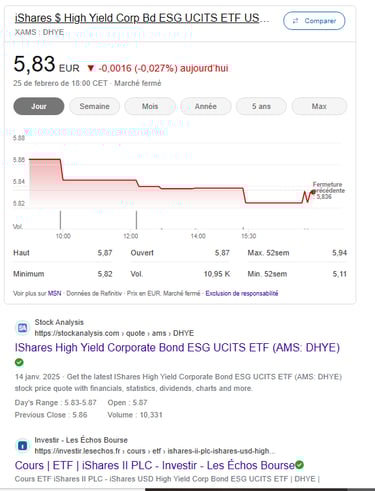
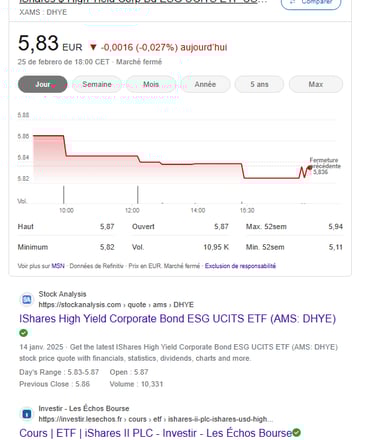
Having clicked on a bank icon of the ETF you want to look into, a pop up window opens (see picture below left) with more information, where you can scroll up and down. Within this pop-up window, you’ll often find a link “Learn more on Bing” which when clicked upon, opens up a totally new page on your browser (see picture below right side)with more information about this investment.
On top of the Bing pop up window you already see a more comprehensible name :
iShares $ High Yield Corp Bd ESG UCITS ETF US, together with a ticker just below [XAMS:DHYE].
The first letter X stands for eXchange, AMS stands for Amsterdam. Look at the price (5.83 EUR) , so the trading and pricing currency is EUR for a fund that contains USD ($) high yield corporate bonds.
That is perfect for European investors who need or wish to invest in USD bonds without having to exchange their EUR into USD.
BANK ICON POP UP WINDOW BING POP UP WINDOW

This is basic homework that every (self-directed) investor should do.
In case your account is advised or managed by a bank or portfolio manager, this is a good place to independently find more info about your investments. Be aware at all times that the ETF’s listed in our catalog are samples which may not be available for distribution in your country or accepted by your bank or broker.
NUMBER OF LINES
The number of necessary choices to be made per asset class per geographic zone is automatically calculated.
In the example below, 2 American Bond ETF's would be needed. The system only takes the first two lines into account and uses data from the ETF's in the first two lines to complete the template and calculate how many units you would need to buy (fractional etf trades should be allowed) to get to the allocated percentages you need to fill in. Again, click on any name as described above to change to an ETF of your choice.
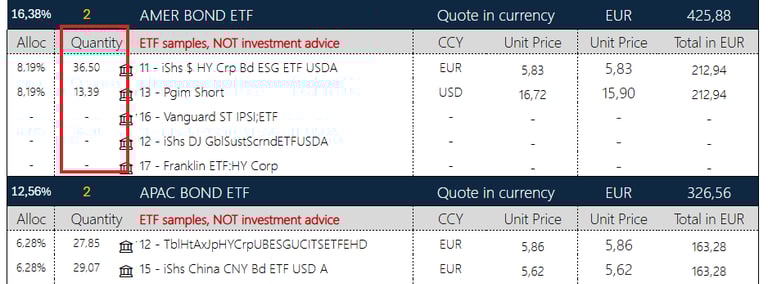
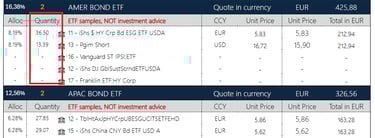
Necessary lines
Based upon what you entered in the “settings box”, the system calculated
the number of lines needed within each box (two in this example)
the percentage per individual investment line (8.19% in this case).
It is perfectly possible to fill a complete box of five lines, even if only one or two lines are necessary. This allows investigating other ETF's than those really needed by clicking on the bank icon”. You can change as often as you like. In the example above, only two lines are needed, so only line one and line two will be incorporated in our purchase list.
More lines
In case you chose more lines than needed, that does not impact the purchase list because the extra lines are not taken into account for the purchase list.
Fewer lines
If you complete fewer lines than needed however, you’ll see that the totals in the control box do not add up correctly, and you will need to choose extra ETF’s until the required number for that box is reached.
Complete all boxes
Make sure to chose your investment for all boxes and complete
3 bond boxes
3 share boxes
1 commodities box
and your purchase list is automatically created
Restrictions of the template
PortfolioBuilder only can draw ETF's from the catalog into the allocation template. For those who wish to use an ETF that is not listed in the non-exhaustive ETF Catalog, a "Blank" PortfolioBuilder will soon be available. This tool will basically allow you to enter direct lines too (like mutual funds or individual shares or bonds).
However, this comes with a caveat: this tool requires you to provide and enter the following data yourself:
Name of the investment
Ticker
Currency
Last price
4 The purchase list
After having entered
your settings
Investor Profile
GDP bias
Reference Currency
Amount to invest
Maximum percentage of portfolio allowed per investment line
your investment choices in all boxes
your purchase list is now complete and automatically generated and/or updated.
Congrats !
With this list you can either directly enter the purchases in your broker platform if you are self-directed, or use it as a basis for work to discuss with your banker, broker or investment adviser. Based upon the demo profile settings in the beginning of this tutorial, you would get a purchase list looking something like this :
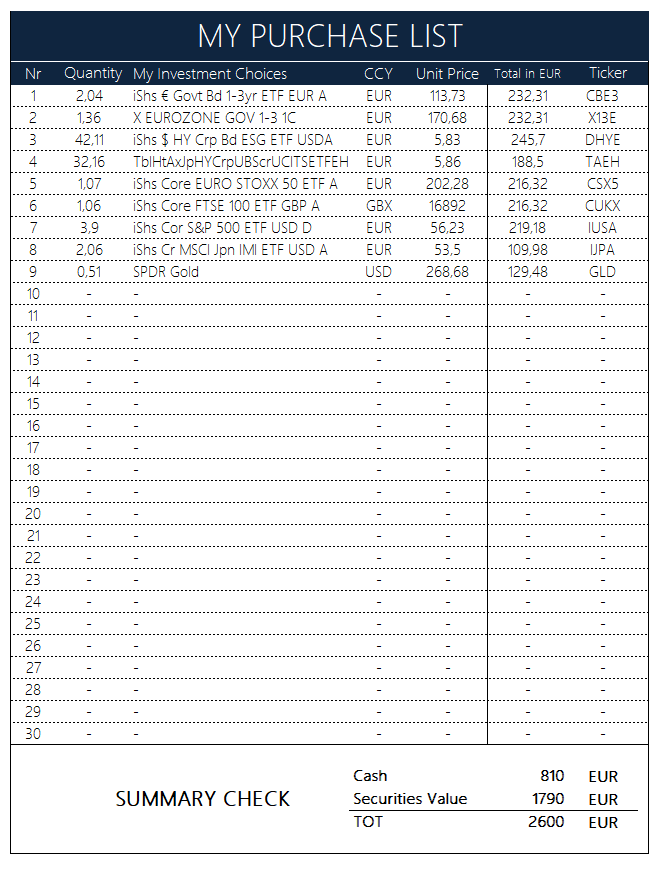
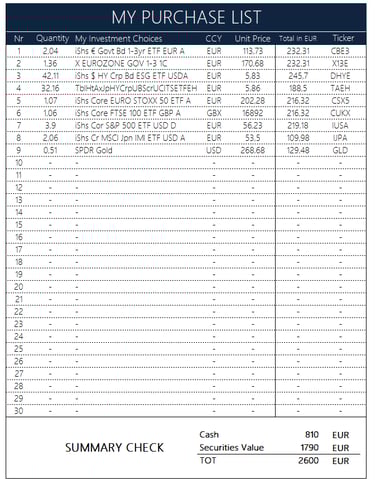
At the very bottom of this purchase list, there is an ultimate check to verify if the numbers add up. In this particular case, you invest 1790 EUR out of the 2600 which was the investible amount you indicated in the settings box.
5 Concluding
YOUR NEW INSIGHTS
Having reached the rock bottom of this tuturial, you now have insights on :
How to allocate your funds over several ETF’s - basically done for you by this tool.
What ETF’s exist by browsing and digging into the catalog.
How to investigate individual ETF’s by clicking on the bank icon, from where you can go even deeper.
LAST BUT CRUCIAL POINTS
You must be aware of, and adapt to, your local reality in order to know which ETF you can or cannot purchase.
In this context, it will always very useful and helpful for you to
either download an "approved list" of ETF’s from your financial platform
and/or obtain such a list from your account contact person
This allows you to know if an ETF is
registered for distribution where you live
accepted where you opened your account.
If you are not (yet) a full-fledged self-directed investor, do not hesitate to inquire with your broker, bank or financial and/or fiscal adviser to clarify regulatory and fiscal aspects applicable to the place you are a fiscal resident.
NEXT LEVEL
If you wish to use ETF’s that are not (yet) in our ETF catalog, you can use the Portfolior Builder Blank tool, which is a blank template of the PortfolioBuilder.
In there you can follow a similar process, as long as you know the name, currency, price and ticker from the ETF’s you’d like to use.
Questions ? Let us know on the contact form !
Invest wisely & stay curious !


MY INVESTMENT ASSISTANT
IMPORTANT INFORMATION
Subscribe and get a free quickstart and clickable financial website list pdf
Empowering Investors with tools